The efficiency of a photovoltaic (PV) installation depends not only on the choice of high-quality components but also on precise and professional assembly. Poor panel positioning, construction errors, or failure to adapt the system to local conditions can lead to reduced performance and increased risk of system failure. This article presents the best installation practices to ensure maximum efficiency and safety for your PV system.
The Importance of Proper PV Installation
Correct installation of a photovoltaic system is a key factor influencing the system’s efficiency, durability, and safety. Mistakes during the design and installation phases can result in:
- Reduced energy production,
- Mechanical damage to the panels and support structure,
- Electrical system failures,
- Shortened system lifespan.
A professional installation approach ensures optimal system performance and compliance with regulations and technical standards such as IEC 61215, IEC 61730, and local legal requirements.
Best Practices for Planning a PV Installation
1. Location Analysis
- The installation site should be chosen to maximize exposure to sunlight. Avoid shading caused by trees, buildings, chimneys, or other obstacles.
- In Poland, the optimal orientation of the panels is due south to ensure maximum sun exposure throughout the year.
2. Optimal Tilt Angle
- In Poland, the optimal panel tilt angle is between 30° and 35°.
- Ground-mounted installations can use adjustable tilt structures to adapt the panels to seasonal changes.
3. Substrate Load-Bearing Capacity
- For rooftop installations, assess the load-bearing capacity of the building structure, considering the weight of the panels, support structure, and potential snow accumulation.
- For ground-mounted systems, check soil stability and choose appropriate foundations (e.g., screw piles, concrete blocks, or footing bases).
Support Structure Installation
1. Choosing the Right Materials
The support structure should be made from corrosion-resistant materials such as galvanized steel, anti-corrosion coated steel (e.g., Magnelis), or aluminum. In chemically aggressive environments (e.g., near the sea), use stainless steel or aluminum structures.
2. Precise Installation
- The structure must be installed according to the design, ensuring an even distribution of loads.
- Connecting elements (bolts, clamps) should be tightened to the appropriate torque as recommended by the manufacturer.
- For rooftop installations, use mounting systems compatible with the type of roofing (e.g., metal sheets, ceramic tiles, membranes).
3. Stability and Weather Resistance
The structure should withstand wind, snow, and extreme temperatures. In regions prone to strong winds, it is advisable to conduct an aerodynamic analysis of the structure.
PV Panel Installation
1. Secure Panel Mounting
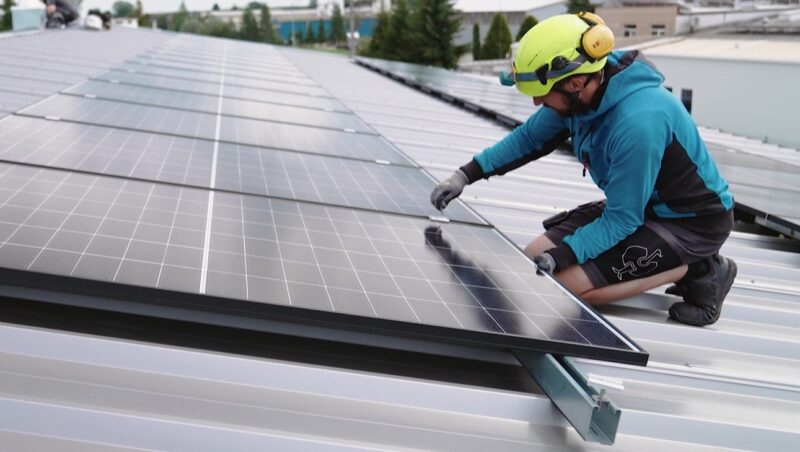
Panels should be mounted on the structure using mounting clamps or dedicated fasteners to ensure stability. Avoid excessive mechanical stress that could damage the modules.
2. Panel Ventilation
Maintaining sufficient space between the panels and the roof or ground allows for natural ventilation, helping to dissipate heat and maintain system efficiency.
3. Avoiding Shading
Even partial shading of a single panel can reduce the efficiency of the entire string. Power optimizers can be used if shading is unavoidable.
Common Installation Issues and Solutions
1. Improper Tightening of Bolts and Fasteners
Problem: Over-tightening bolts can deform structural elements, while under-tightening can make the structure unstable, increasing the risk of displacement or damage from strong winds.
Solution:
- Use torque wrenches to tighten bolts according to the manufacturer’s recommended torque.
- Regularly check all connections for compliance with technical documentation.
- Perform a post-installation inspection to detect loose or overloaded elements.
2. Lack of Grounding for the Support Structure
Problem: PV structures made of conductive materials such as steel or aluminum should be grounded. Lack of grounding increases the risk of system damage due to lightning strikes and non-compliance with safety standards.
Solution:
- Use grounding cables and clamps compliant with standards such as IEC 62305.
- Ensure all structural elements are electrically connected and properly grounded.
- Measure grounding resistance to confirm compliance with technical requirements.
3. Improper Leveling of the Structure
Problem: A structure set on uneven terrain can result in uneven panel loads, increasing the risk of damage.
Solution:
- Level the ground or roof surface during site preparation.
- Use a laser level or other precise measurement tools during installation.
- For ground-mounted systems, use adjustable-height foundations to correct for uneven terrain.
4. Incorrect Support Placement
Problem: Large gaps between supports can cause excessive stress on the structure, while supports placed too closely can increase material costs.
Solution:
- Follow the manufacturer’s recommendations for maximum support spacing.
- Account for local wind and snow loads when designing support placement.
- Perform static calculations for each installation, especially in areas with challenging weather conditions.
5. Use of Improper Mounting Materials
Problem: Low-quality materials, such as bolts prone to corrosion, can shorten the lifespan of the structure.
Solution:
- Choose mounting elements made from corrosion-resistant materials, such as stainless or galvanized steel.
- Check for quality certifications provided by the manufacturer.
- Avoid mixing different metals (e.g., aluminum and steel) without using electrochemical insulation to prevent galvanic corrosion.
6. Failure to Consider Aerodynamic Forces
Problem: Ground-mounted and rooftop structures are exposed to aerodynamic forces that can cause instability.
Solution:
- Perform an aerodynamic analysis, especially for large installations or in regions with high wind speeds.
- Use additional ballast weights for rooftop installations on flat roofs.
- Consider the direction of prevailing winds when designing and installing the structure.
7. Insufficient Row Spacing Between Panels
Problem: Small distances between rows in ground-mounted installations can cause shading, reducing system efficiency.
Solution:
- Calculate optimal row spacing based on the tilt angle of the panels and their geographic orientation.
- Account for potential shadow shifts throughout the year (helioscope analysis).
8. Lack of Corrosion Protection in Humid Areas
Problem: High humidity, such as near water bodies, can cause the structure to corrode.
Solution:
- Use anti-corrosion coated steel (e.g., Magnelis) or aluminum structures.
- Regularly inspect protective coatings and replenish them as needed.
9. Failure to Conduct Pull-Out Tests for Supports
Problem: Without thorough ground tests, it is impossible to determine how much dynamic load (e.g., strong wind) the supports can withstand. This can lead to system instability or failure.
Solution:
- For large-scale projects, conduct pull-out tests at the installation site.
- These tests involve applying controlled vertical loads to the installed supports to evaluate their load-bearing capacity.
- Use test results to choose appropriate support length and diameter or decide to use concrete foundations or root anchoring systems.
10. Inadequate Geotechnical Analysis and Soil Assessment
Problem: Different soil layers, the presence of peat, clay, or low-load-bearing sand, can affect the structure’s stability. Ignoring these aspects can lead to settlement or tilting.
Solution:
- Conduct a detailed geotechnical analysis, including:
- Soil type and layers,
- Load-bearing capacity,
- Presence of groundwater,
- Peat or other unstable layers.
- For low-load-bearing soils, consider point foundations, screw piles, or root anchoring systems that distribute the load over a larger area.
11. Ignoring Soil Corrosivity Around Supports
Problem: Soils with high moisture, salt, or chemical content can accelerate the corrosion of underground structural elements, weakening supports over time.
Solution:
- Conduct chemical soil tests to assess potential corrosivity.
- In chemically aggressive environments, such as saline soils, use:
- Anti-corrosion coated steel (e.g., Magnelis, Zamex, Posmac),
- Stainless steel supports,
- Plastic protective layers on buried elements.
- In high-humidity areas, apply additional protective coatings such as epoxy layers.
Conclusion – Best Practices for PV Installation
Proper installation of a photovoltaic system requires careful planning, the selection of appropriate materials and technologies, and precise execution at every stage. Following best installation practices ensures maximum system efficiency, minimizes the risk of failure, and extends the installation’s lifespan. Hiring certified specialists ensures that your installation meets all technical standards and requirements.


